Saturday, March 25, 2006

HTTP GET your Web Services here

When Java programmers talk about Web Services, they are often talking about Simple Object Access Protocol (SOAP). With JAX-RPC and JAXM libraries to build SOAP messages, released via the Sun Java Community Process (JCP), and the open-source Apache Axis project, SOAP is almost the reference implementation for Web Services. Web Services work by serializing the remote procedure call (RPC) into XML, then wrapping the XML in some more XML to specify message properties, such as the destination server URL, the SOAP version being used, etc. The server deserializes the XML into the appropriate method call, executes it, serializes the result back into XML, and wraps it in more XML and sends it back to the client via HTTP.

Older versions of Web Services (SOAP 1.1) used HTTP POST exclusively as the underlying protocol to send and recieve messages. This makes sense, because your calls can have Objects as method parameters, and these are easier to encode as XML in a POST than as parameters in a GET request. However, this restriction runs afoul of the HTTP specification, which says that one should use HTTP GET requests for calls which do not change the state of the server or have any side effects, and HTTP POST requests for calls that do. So read-only Web Service calls, such as getting a stock quote from a stock server, should not require me to use HTTP POST. Even if you don't mind bending the spec once in a while, there is a practical downside - for caching (and you will need caching if you have any significant traffic), you are limited to using a cache that resides within the server JVM, rather than an external cache such as Squid, which can be more appropriate sometimes. SOAP 1.2 addresses this issue and provides support for HTTP GET requests.

SOAP tends to be quite verbose, however, and consumes serious bandwidth. Lighter alternative implementations such as Caucho's Burlap or Hessian are adequate for most applications, with the added advantage of minimal (compared to SOAP) network overhead. However, neither Burlap nor Hessian supports HTTP GET requests. This article describes how to enable HTTP GET support for Burlap using the Spring Framework.

Axis 1.1 (with SOAP 1.1, which did not support HTTP GET requests) has a workaround which provides limited support for GETs, as this article explains. My objective was to do something similar for Burlap, so I could pass the method name and the arguments as request parameters.

To illustrate this, I created an API which exposes the following two methods. This API will live on both client and server.

1
2
3
4
public interface IArticleService {
    public Article getArticle(Long articleId);
    public Comment[] getCommentsForArticle(Long articleId);
}

On the server side, there is a simple POJO service (called ArticleService) which implements the IArticleService interface. This POJO is injected into the BurlapServiceGetServiceExporter (described below) in the server's Spring configuration. This is what the server configuration looks like:

1
2
3
4
5
6
<bean id="articleService" class="org.springchains.app.chains.remoting.server.ArticleService" />
                                                                                
<bean id="articleServiceExporter" class="org.springchains.framework.remoting.server.BurlapGetServiceExporter">
    <property name="serviceInterface" value="org.springchains.app.chains.remoting.api.IArticleService" />
    <property name="service" ref="articleService" />
</bean>

The BurlapGetServiceExporter is similar to the BurlapServiceExporter provided by Spring, except that it supports HTTP GET requests only. Its really a specialized Spring Controller object, and extends Spring's RemoteExporter, and overrides the setService() and handleRequest() methods. The handleRequest() method looks for the required parameters method (for method name to call), pn (the number of parameters), p0..pn (the parameter values), and t0..tn (parameter types). It then constructs objects out of the p/t pairs by calling t's String constructor, and invokes the method on the service using reflection. It then creates a Burlap response object and writes this into the request.

 1
 2
 3
 4
 5
 6
 7
 8
 9
10
11
12
13
14
15
16
17
18
19
20
21
22
23
24
25
26
27
28
29
30
31
32
33
34
35
36
37
38
39
40
public class BurlapGetServiceExporter extends RemoteExporter implements
        Controller, InitializingBean {
 
    private static final Log log = LogFactory.getLog(BurlapGetServiceExporter.class);
     
    private Object service;
     
    public BurlapGetServiceExporter() {
        super();
    }
     
    public void setService(Object service) {
        super.setService(service);
        this.service = service; // we need this local copy, as service is private in superclass.
    }
 
    public ModelAndView handleRequest(HttpServletRequest request, HttpServletResponse response)
            throws Exception {
        String methodName = RequestUtils.getRequiredStringParameter(request, "method");
        int numberOfParameters = RequestUtils.getRequiredIntParameter(request, "pn");
        Object[] params = new Object[numberOfParameters];
        for (int i = 0; i < numberOfParameters; i++) {
            String type = RequestUtils.getRequiredStringParameter(request, "t" + i);
            String param = RequestUtils.getRequiredStringParameter(request, "p" + i);
            params[i] = ConstructorUtils.invokeConstructor(Class.forName(type), param);
        }
        Object result = MethodUtils.invokeMethod(service, methodName, params);
        response.setContentType("text/xml");
        BurlapOutput output = new BurlapOutput(response.getOutputStream());
        output.startReply();
        output.writeObject(result);
        output.completeReply();
        return null;
    }
 
    public void afterPropertiesSet() throws Exception {
        checkService();
        checkServiceInterface();
    }
}

On the client side, the ArticleServiceHttpClient is provided the serviceUrl to make the RPC call. This is what the client configuration looks like:

1
2
3
<bean id="articleServiceClient" class="org.springchains.app.chains.remoting.client.ArticleServiceHttpClient">
    <property name="serviceUrl" value="http://localhost:8080/chains/article-service.html" />
</bean>

The actual ArticleServiceHttpClient is shown below. The methods just delegate to the IArticleService proxy that is created using the BurlapHttpGetFactory.

 1
 2
 3
 4
 5
 6
 7
 8
 9
10
11
12
13
14
15
16
17
18
19
20
21
22
23
24
25
26
27
28
public class ArticleServiceHttpClient implements IArticleService {
     
    private static final Log log = LogFactory.getLog(ArticleServiceHttpClient.class);
     
    private String serviceUrl;
 
    public ArticleServiceHttpClient() {
        super();
    }
     
    public void setServiceUrl(String serviceUrl) {
        this.serviceUrl = serviceUrl;
    }
 
    public Article getArticle(Long articleId) {
        return getProxy().getArticle(articleId);
    }
 
    public Comment[] getCommentsForArticle(Long articleId) {
        return getProxy().getCommentsForArticle(articleId);
    }
     
    private IArticleService getProxy() {
        log.debug("Creating IArticleService proxy with serviceUrl: " + serviceUrl);
        BurlapHttpGetProxyFactory factory = new BurlapHttpGetProxyFactory();
        return (IArticleService) factory.create(IArticleService.class, serviceUrl);
    }
}

The BurlapHttpGetProxyFactory.create() method returns a BurlapHttpGetInvocationHandler (aka Proxy) as a simple JDK Proxy object for IArticleService. The BurlapHttpGetInvocationHandler.invoke() method serializes the method call into a HTTP GET request using the rules detailed above, and sends it off to the service URL. It then parses the response that the service returns back into the Object that the remote call is supposed to return. Here is the code for these classes.

 1
 2
 3
 4
 5
 6
 7
 8
 9
10
11
12
13
14
15
16
17
18
19
20
21
22
23
24
25
26
27
28
29
30
31
32
33
34
35
36
37
38
39
40
41
42
43
44
45
46
47
48
49
50
51
52
53
54
55
56
57
58
59
60
61
62
63
64
65
66
67
68
69
70
71
72
public class BurlapHttpGetProxyFactory {
 
    public BurlapHttpGetProxyFactory() {
        super();
    }
     
    public Object create(Class interfaceClass, String serviceUrl) {
        return Proxy.newProxyInstance(
            interfaceClass.getClassLoader(),
            new Class[] {interfaceClass},
            new BurlapHttpGetInvocationHandler(serviceUrl));
    }
 
}

public class BurlapHttpGetInvocationHandler implements InvocationHandler {
 
    private Log log = LogFactory.getLog(BurlapHttpGetInvocationHandler.class);
     
    private String serviceUrl;
     
    public BurlapHttpGetInvocationHandler(String serviceUrl) {
        this.serviceUrl = serviceUrl;
    }
 
    public Object invoke(Object proxy, Method method, Object[] args)
            throws Throwable {
        HttpMethod httpMethod = null;
        try {
            HttpClient client = new HttpClient();
            httpMethod = new GetMethod(buildUrl(serviceUrl, method, args));
            int rc = client.executeMethod(httpMethod);
            if (rc != HttpStatus.SC_OK) {
                throw new Exception("GET Failed, HTTP Status:" + rc);
            }
            return parseResponse(httpMethod.getResponseBodyAsStream());
        } finally {
            if (httpMethod != null) {
                httpMethod.releaseConnection();
            }
        }
    }
 
    private String buildUrl(String baseUrl, Method method, Object[] args) {
        String methodName = method.getName();
        Class[] types = method.getParameterTypes();
        StringBuffer ubuf = new StringBuffer(baseUrl);
        ubuf.append("?method=").append(methodName).
            append("&pn=").append(args.length);
        int i = 0;
        for (Object arg : args) {
            ubuf.append("&p").append(i).append("=").append(String.valueOf(arg));            ubuf.append("&t").append(i).append("=").append(types[i].getName());
        }
        log.debug("url=" + ubuf.toString());
        return ubuf.toString();
    }
 
    /**
     * Parse the Burlap XML response sent by the server into the equivalent
     * object representation.
     * @param response the response InputStream.
     * @return the Object.
     * @throws Throwable if a RuntimeException occurs.
     */
    private Object parseResponse(InputStream response) throws Throwable {
        BurlapInput istream = new BurlapInput(response);
        istream.startReply();
        Object obj = istream.readObject();
        istream.completeReply();
        return obj;
    }
}

Application code to invoke the RPC calls on the client is identical to the code that one would normally use to call standard Burlap services with spring. Examples are shown below:

1
2
3
4
5
6
7
        ArticleServiceHttpClient client = (ArticleServiceHttpClient) ctx.getBean("articleServiceClient");
        Article article = client.getArticle(new Long(1));
        // ... do something with article ... 
        Comment[] comments = client.getCommentsForArticle(new Long(1));
        for (Comment comment : comments) {
            // ... do something with comments ...
        }

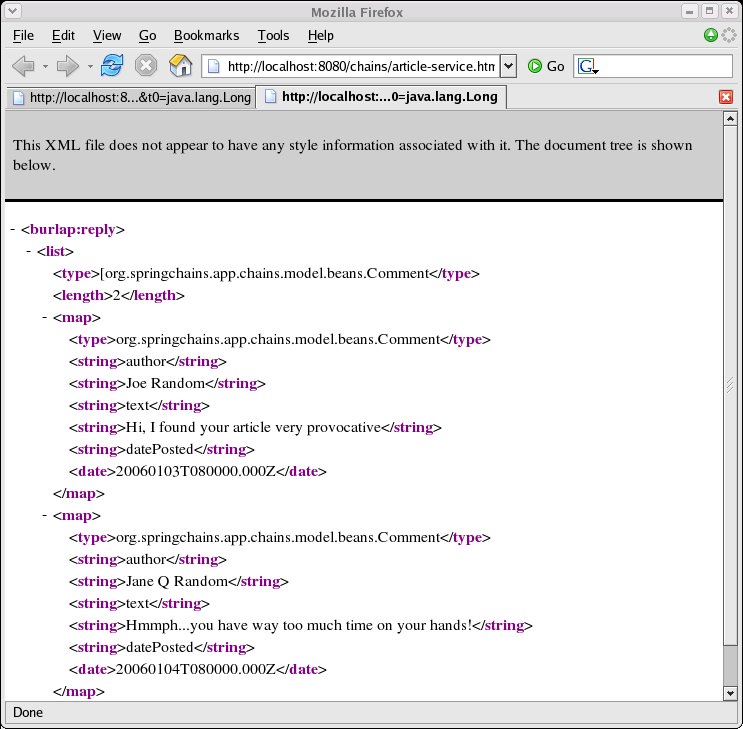
As an added bonus, you can even invoke the service using your browser. Note that this worked for me on Firefox 1.0.7, but not on Firefox 1.5 or Microsoft IE 6, because the latter are more picky about namespace prefixes (the burlap portion in the burlap:reply element), and complain that the prefix is not mapped to a namespace. Hopefully, there is a simple browser workaround for this, please let me know if you know of one. Here are some screenshots of my browser with the XML responses to these two method calls.

So there you have it, folks. A complete drop in replacement for accessing your Burlap services with HTTP GET requests where appropriate. Assuming you supply the client with a toolkit to access your service, application code to access your toolkit remains identical. The client toolkit will now use BurlapHttpGetProxyFactory to generate the proxy instead of the BurlapHttpProxyFactory provided by Spring. On the server, the Spring BurlapServiceExporter is replaced with the BurlapGetServiceExporter.

Of course, there are caveats to this approach. You need to make sure that your arguments must be objects which take a String constructor, so you will have to do some extra work if you want to pass parameters which are not primitive wrappers (Long, Integer, String, etc). This can be achieved by encoding these objects as JSON or JPList (written by yours truly) strings and parsing it back to the object on the server. You also need to consider the length restrictions of HTTP GET requests (512 bytes).

Saturday, March 18, 2006

Book Reviews with Ruby On Rails

Late last year, I came across this ONLamp article on Ruby on Rails. I had heard of the scripting language Ruby before, while I was looking at moving to Python from Perl as my scripting language of choice. To be honest, Ruby the language did not (and still does not) interest me very much. I find it lacking in many features that is taken for granted in Perl, and to a lesser extent, Python. I also find the syntax of Ruby a little "unnatural", since it overloads various syntax notations that mean different things in Perl, which I am already used to.

So, had it not been for Ruby on Rails, I probably wouldn't have looked at Ruby ever again. However, Ruby on Rails (RoR) provides functionality that is too good to pass up merely because I dont like the underlying language. To put it briefly, RoR is a web-development toolkit in a box. You provide the underlying database schema, and RoR provides scripts that generate a bunch of files that will provide basic CRUD (Create, Retrieve, Update, Delete) functionality via a web browser. All without writing a single line of Ruby code!

Of course, what RoR generates is almost never going to be good enough for your customers, unless your customers have exceptionally low expectations, or unless the customer is you and you are looking for an alternative to doing straight SQL calls on the database. This is because the database (and by extension, RoR) does not know how its various tables are linked together. To make the RoR application look remotely like something from the real world, you will have to learn about how RoR works, and you will have to learn Ruby. So the TANSTAAFL (There A'int No Such Thing As A Free Lunch) rule applies here as well.

Luckily, I fell into the latter category. I needed a tool to write and populate book reviews into a database. These book reviews would then be rendered into web pages for my Amazon.com affiliate website.

But first, a little history. Sometime in 1996, I signed up for a free web page from Geocities, a company which has since been acquired by Yahoo!. I knew some basic HTML, actually above-average for the time, since I had recently finished writing a CGI program to allow people to send me database change request forms over the corporate intranet. Two sites I found particularly helpful were Joe Burn's HTMLGoodies (for HTML coding) and Phil Greenspun's photo.net (for CGI scripting).

Some time later, Amazon.com started selling books, and they attempted to increase their marketing presence by offering the Amazon affiliate program, and I happily signed up for that too. I figured that I would be particularly well suited for this sort of thing, since I read (a lot, mostly technical books), both out of choice (because I enjoy reading) and necessity (because my career requires me to keep abreast of the very rapid changes in my chosen field). I also figured that if I did get some commissions on clickthrough traffic, maybe I could buy a couple of books a year with that money, not much I know, but every little bit helps. So I wrote up some book reviews of what I had read, and put up a page with the links to Amazon's store.

However, I was writing the pages manually with a text editor, so remembering to keep each review in the same format and keeping the links consistent was laborious and time consuming. I also never actually made any money off the affiliate storefront. I soon found other, more interesting things to do, and the site languished for a while. I then redesigned the entire site to be link-less (ie, no links between pages in my site) site, so it would cut down on the manual labor involved in keeping links up-to-date. But the site as a result of the redesign was (and still is) ugly and almost un-navigable.

I have been planning another site redesign, this time as static pages generated off content from a database. So RoR looked ideal for building a simple tool that would let me enter book reviews and categorize them into various broad categories. I could write a Python script to read the database and generate a bunch of HTML pages which I could upload to the geocities server. So in effect, I was getting my free lunch - a web based tool to enter my data, written in Ruby by RoR, and a Python script (which I would write myself, and which was "free" too, since I already knew Python) to generate the pages and upload to the server.

So last week I set up a simple RoR application with two tables in the database - books and categories. A category can have many books within it. The process to get the basic CRUD functionality up took less than an hour. Here is the database schema:

 1
 2
 3
 4
 5
 6
 7
 8
 9
10
11
12
13
14
15
create table books (
    id bigint not null auto_increment,
    name varchar(255) not null,
    author varchar(255) not null,
    amazon_asin varchar(32) not null,
    review text not null,
    category_id bigint not null,
    primary key(id)
) type=InnoDB;
                                                                                
create table categories (
    id bigint not null auto_increment,
    category_name varchar(128) not null,
    primary key(id)
) type=InnoDB;

RoR is optimized for MySQL. My database of choice for personal work is PostgreSQL, but I could not make RoR work with it. Although I did not try very hard, all I did was download postgres-pr (the Ruby binding for PostgreSQL) and update the config/database.yml file to use PostgreSQL. I may have to learn more about RoR to hook it up with PostgreSQL.

The only other changes I had to make to link categories and books together in the RoR object model was to add the belongs_to and has_many declarations to the model classes:

1
2
3
4
5
6
7
8
9
# app/models/book.rb
class Book < ActiveRecord::Base
    belongs_to :category
end

# app/models/category.rb
class Category < ActiveRecord::Base
    has_many :book
end

To make the selection list of categories to show up in my Book edit form, I added this single line to the edit method in app/controllers/books_controller.rb to generate the complete list of categories.

1
2
3
4
5
def edit
    @book = Book.find(params[:id])
    # added this line
    @categories = Category.find_all
end

And this snippet to the views/books/edit.rhtml file to display a select list of all categories with the currently selected category highlighted.

 1
 2
 3
 4
 5
 6
 7
 8
 9
10
11
12
13
14
# views/books/edit.rhtml
...
<%= render :partial => 'form' %>
# added this snippet here                                                                                
&;lt;p><b>Category:</b><br>
<select name="book[category_id]">
 <% @categories.each do |category| %>
     <option value="<%= category.id %>"
       <%= ' selected' if category.id == @book.category_id %>>
       <%= category.category_name %>
     </option>
 <% end %>
</select></p>
...

All these changes did not require me to gain a deep understanding of the RoR framework, I really extrapolated from Curt Hibbs's ONLamp article referenced above.

However, I have been looking at the features of RoR in more depth since I first saw the ONLamp article. I have even purchased the book "Agile Web Development with Rails" by Dave Thomas and David Hansson, and have read through it to understand how RoR works under the covers. I find RoR to be a very well constructed toolkit. A lot of thought has been put into the correct way to do things, such as using HTTP POST requests to trigger operations that update the database. It also automatically generates unit test code skeletons as it generates the code for controllers, views and models, so there is built in support for a test driven development environment. RoR has fewer artefacts than comparitive J2EE frameworks, since RoR relies on convention rather than configuration, and for most of the artefacts that it does need, it generates at least a base template which the developer can customize. Because RoR generates the base application, its developers typically have more time to spend writing code thats important to the customer rather than trying to configure the framework to work with the application. As a result, a RoR developer is more likely to develop a well-designed application with fewer bugs than a Java/J2EE developer.

Saturday, March 11, 2006

Return of the JDEE

Over the past year, I have been using Eclipse, the free and very popular open-source Java IDE, along with commercial plugins provided by MyEclipse. Prior to that, I was (and still am, for non-Java coding and editing), a vim user. I totally missed the boat on EMACS, much like I missed the boat on C++ (went directly from C to Java), or more lately, "classic" J2EE with EJBs (went from plain servlet programming to POJO based frameworks). In fact, my first job out of college was as a Software field support engineer with a computer manufacturing company which sold midrange Unix systems, so you could say I practically cut my teeth on vi (the predecessor of vim).

I have always been interested in learning EMACS, however, because it seemed to be the IDE/editor of choice for the uber-geeks among my colleagues before they switched to their favorite Java IDEs. I noticed that they would use emacs for as many things as they could, from writing code to reading email, running shell commands, etc. In retrospect, it could be because of the long startup times for emacs on the comparitively memory bound systems that were in use at the time. So when I switched to Eclipse, I changed the editor key-bindings from the default CUA Windows-style to EMACS mode, figuring that this would give me a head start on getting my fingers used to EMACS commands.

EMACS has been vilified as "Eight Megabytes And Constantly Swapping" because of its comparitively high memory requirements. I recently looked at the Eclipse memory footprint on my workstation and compared it to the footprint of an equivalent EMACS, and they weighed in at 100MB and 20MB respectively. So, not surprisingly, EMACS consumes fewer resources than standard IDEs in use today. The question remains - does it offer similar functionality to the Java programmer?

As it turns out, there is a comprehensive and free Java plugin suite for emacs, called JDEE. I was pretty impressed with the JDEE feature set, so I decided to install it and take it out for a spin. This article provides some resources on how to install JDEE, and compares JDEE features to corresponding Eclipse features. I also highlight Eclipse functionality that I missed in JDEE.

Installing JDEE

Assuming you are running a stock Linux distribution, you should already have EMACS or XEMACS installed. If you are new to EMACS, be aware that most of the customization and features are provided by EMACS-Lisp (.el) files in your site-lisp directory, (in my case, ~/.emacs.d), which are invoked from your EMACS startup file (~/.emacs).

JDEE requires quite a few plugins to work, they are listed on the Installing the JDEE page. This is quite a bit of work, but fortunately, you can use Artur Hefczyc's script to do this with a single command. It seems to be a little out of date, however, since I had to upgrade the cedet and jde packages to the latest ones to make JDEE work.

I used Artur's .emacs and prj.el files as a starting point. He is a long time EMACS user, so he has references to various external plugins in his .emacs file which will show up as error messages in EMACS when it is started up. Fortunately, he has been very good about documenting the websites where he downloaded his sources in his .emacs file, so it was a simple matter to go to these sites and download the .el files, and install them into my ~/.emacs.d/site-lisp directory. The only one I could not do was color-themes.el, but since his default color scheme worked fine for me, this wasn't an issue.

Setting up the JDEE

EMACS/JDEE dependencies that are needed for Java programming need to be set up in a prj.el file. This is similar to the .prefs file in Eclipse, and can either be set up for all your projects or separately for each project. Overriding is by directory hierarchy, so your "global" prj.el may be in your home directory, and a project specific prj.el file for a project located at ~/src/myproject would be in ~/src/myproject/prj.el. The settings in the project specific prj.el will override corresponding settings in the global prj.el. Settings include standard boilerplate templates, your source and class paths, the JDK compiler you are using, coding standards such as tab width, import style, etc. Artur provides his prj.el file on his site, which can be used as a base for customizing it to your environment.

Faceoff: JDEE vs Eclipse

One of the things that prompted me to look at JDEE is that, unlike other developers I know, I tend to not do everything in the IDE. For example, I rarely build code or run JUnit tests from within the IDE, I rely on Ant build scripts instead, which I run from a terminal window. I also prefer interacting with the source code repository (CVS in my case) using the command line rather than the GUI based interface provided by the IDE. To access various databases, I prefer using the command line clients provided by the database vendor rather than use the MyEclipse SQL Explorer feature. I also prefer using Eclipse keyboard shortcuts over mouse-based point and click interaction. So I figured, so what if JDEE does not provide all the features that Eclipse has? For my comparison, I only concentrate on the features I need and use myself.

  • Moving around: Moving around the editor in both systems is similar, since I already use EMACS key bindings in Eclipse.
  • Selecting a JDK: Both Eclipse and JDEE can specify a JDK (Java 1.5 versus Java 1.4, for example) per project. You set this up in Eclipse in Project Properties and in the jde-jdk (Mx jde-jdk) customization buffer in EMACS/JDEE.
  • Opening type/resource: Eclipse can open a Java file using CT and non-Java files using CR. JDEE can open a Java file using Mx jde-open-class-source command. For finding resource files, I think you will have to revert to using Unix find or use the JDEE Speedbar (Cv Cc Cs).
  • Cross reference files: Hitting F3 on a class or variable declaration in Eclipse allows you to go to the source or generated Javadoc (if no source is available) of that declaration. EMACS/JDEE uses etags to do the same thing, although you will need to set up a cross-reference database for this.
  • Code Templates: Like Eclipse, EMACS/JDEE offers code templates for new class and interface files, wizards for get/set, listener, delegate and abstract class extension methods, package generation wizards, organizing imports, etc. These are available in Eclipse under the Source menu and in EMACS/JDEE under the JDE/Code Generation menu.
  • Autocompletion: In Eclipse, you can press M/ to see a list of suggested completions for your statement. With EMACS/JDEE, the command sequence is Cc Cv C-.
  • Inline error reporting: I am referring to the red or yellow squigglies under the offending peice of code, depending on whether it is a error or warning, possibly inspired by the MS-Word spellcheck feature we have all grown to know and love. I could not find an equivalent functionality in EMACS/JDEE.
  • Code suggest: Eclipse sometimes provides suggestions (via the lightbulb icon) on better ways to do the same thing. This is also not available in EMACS/JDEE as far as I could see.
  • Support for non-Java languages: EMACS obviously leads on this one, having been around longer. I suspect its also easier to build new editor plugins with E-LISP than with the Eclipse plugin architecture, although this is pure speculation on my part, having never developed either an E-LISP EMACS plugin or an Eclipse plugin.
  • Ability to edit remote files: This is more of an EMACS feature than an Eclipse one. You can connect to a remote computer over ssh and use a local (text-based) EMACS to edit the remote file. Of course, this is not an option with Eclipse.

The closest analogy I can think of when comparing Eclipse and EMACS/JDEE is the difference between a car with automatic transmission (Eclipse) and one with manual (EMACS/JDEE). In the hands of the right driver (or programmer), both are equally powerful and functional. Unfortunately, while IDEs provide you the tools to write code more rapidly, they also help atrophy skills that you had to have before and now you no longer need to. When I wrote my code with vim, I would spend more time ramping up with new libraries, but at the end of the project, knew my libraries much better because I had actually spent time reading the Javadocs and playing around with wrong combinations. Nowadays, most of the time I do a M/, look through the list of method names, and choose the one which looks right. Of course, it also meant that I would restrict myself to using fewer libraries to begin with.

Now for the million dollar question. Would I switch from Eclipse to EMACS/JDEE? I dont think I am ready to do this just yet. Like other programmers who did not grow up with IDEs, I recognize that my use of IDEs has made me lazier and less of a programmer than I used to be. I am also a relative EMACS newbie, so I would need to gain more expertise with EMACS to consider switching. However, one place where I plan to use EMACS/JDEE is when I am working from home remotely on my desktop at work. I have written previously about using rsync to do this, but I think that this may be a better way. I am also beginning to use EMACS more and more for non-Java work, such as when I am writing Python scripts.

Saturday, March 04, 2006

Tapestry Newbie Recipes

Recently, I set out to learn Tapestry by writing a web-based tool for managing a Drools rules repository for Drools 3.0. The tool is not done yet, but I did learn enough about how to use Tapestry for various scenarios, which I share here. These recipes would be most useful to people who have used classic web MVC frameworks such as Spring and Struts, since I mostly highlight the difference in approach between the classic MVC way and the Tapestry way of doing things.

When designing a new web application, I typically build the CRUD (Create, Retrieve, Update and Delete) views of all the entities first, and worry about the navigation later. There are only two views required per entity, as can be seen from the state diagram on the right. The List view will show a list of the entities available in the database filtered by some query criteria, or all entities available if there is no query applied. The Edit view will show a form which will allow editing an existing entity, or adding a new entity. There could be a third view, a Show View, where you show a similar form based view of the entity, but the Edit view could be repurposed for this with a little HTML magic.

However, before I start on the recipes on how to generate the Edit and List views with Tapestry, a little background on how Tapestry differs from other web MVC frameworks is in order. The classic web MVC application has the following layers:

  • The Model: These are typically JavaBeans that provide getters and setters to expose the properties required by the view JSPs, and are populated via a service manager which exposes services from the Data Access Objects (DAOs).
  • The Controller: Controller classes connect the Model (data) beans with the View (rendering) beans. A web MVC framework usually provides an uber Servlet class which would delegate to one of the Controller classes based on the request it recieves.
  • The View: Views are typically JSPs in Java based web frameworks, although Velocity templates are also a popular alternative.

On the other hand, Tapestry applications are layered in the following manner.

  • The Java bean: This roughly corresponds with the model layer described above, with one important addition. It also contains listener methods, which respond to events sent from the HTML view component. So in a sense, this layer contains the Model and part of the controller logic to do routing.
  • The page specification: The page specification (.page) connects the HTML view layer with the JavaBean layer. It contains the full class name of the JavaBean, and contains mappings between the HTML elements (specified by the jwcid attribute) to the properties exposed by the JavaBean via getXXX() and setXXX() methods.
  • The HTML view: The HTML view is a plain HTML file. HTML elements that Tapestry would use for dynamic content are marked with the jwcid attribute. The actual dynamic content is specified using OGNL syntax. Buttons and links which are marked with the jwcid attribute can be configured to fire events which are handled by the JavaBean mapped to the view.

So whats so great about Tapestry, other than the fact that it layers its stuff a little differently? First, unlike any other Java based MVC, the views are all perfectly valid HTML, which means that a web designer who does not know JSP can work on the HTML without any fear of breaking the page, and that the page will show up correctly in a standard HTML viewer. Second, like Velocity, it removes the temptation for the web developer to put fancy logic inside the view layer in the form of JSP scriptlets. Third, the listener framework built into Tapestry makes routing much simpler than classic web MVC frameworks. Fourth, because Tapestry is so component-based, there are a large number of Tapestry and contributed components that provide complex HTML functionality (including Javascript) which you can use like prebuilt Lego blocks to build your web pages faster.

The downside of Tapestry, obviously, is its differences from classic web MVC frameworks, necessiating a steep learning curve for people coming from these frameworks. But comprehensive documentation is included with the Tapestry distribution, and if you spend the time to go through and understand this information, I think it will be time well spent, and you will be rewarded with faster development cycles and cleaner and more maintainable code.

There are some other downsides, too, for which there are no clear-cut answers. For one, the URLs generated by Tapestry are non-intuitive and not bookmarkable. Second, Tapestry depends heavily on sessions, and I have a feeling that it may not scale to large volumes, although Tapestry has been used to build the ServerSide.com application (although the author was Howard Lewis Ship, the author of Tapestry himself), which handles quite high loads. So for these, its really a tradeoff. If you dont care about bookmarking URLs or really heavy loads, then Tapestry's benefits may worth looking at.

Recipe: Typical Tapestry directory structure: The Tapestry directory structure is very formalized, and as far as I know, there is no way to change it to suit your standards police. For an application called myapp, the directory structure is as follows:

 1
 2
 3
 4
 5
 6
 7
 8
 9
10
11
12
13
    myapp
      +-- context (contains all the .html files for pages)
      |     +-- WEB-INF (contains .page (page specification),
      |     |    |                .jwc (component specification),
      |     |    |                .html files for components,
      |     |    |                myapp.application,
      |     |    |            and web.xml files).
      |     |    +-- lib (contains all the .jar files needed)
      |     |    +-- classes (contains .properties, .xml and other property files,
      |     |                 generated .class files from src directory).
      |     +-- css (contains stylesheet, can have different name)
      |     +-- images (contains image files, can have different name)
      +-- src (the root of the Java source tree)

Recipe: The Visit and Global objects: The Visit and Global objects are developer built objects that per application. These objects are visible to the ApplicationEngine (Tapestry's version of the uber-servlet) via the myapp.properties file as shown below. The Visit object provides session-specific functionality, such as login authentication, and the Global object provides application wide functionality.

 1
 2
 3
 4
 5
 6
 7
 8
 9
10
11
12
13
14
15
16
<?xml version="1.0" encoding="UTF-8"?>
<!DOCTYPE application PUBLIC                                                                                  "-//Apache Software Foundation//Tapestry Specification 3.0//EN"                                                                                  "http://jakarta.apache.org/tapestry/dtd/Tapestry_3_0.dtd"> <application name="pluto" engine-class="org.apache.tapestry.engine.BaseEngine">
    <description>My Application</description>
    <property name="org.apache.tapestry.visit-class">
        com.mycompany.myapp.Visit
    </property>
    <property name="org.apache.tapestry.global-class">
        com.mycompany.myapp.Global     
    </property>     
    <!-- you are almost certain to need the contrib component library -->
    <library id="contrib" specification-path="/org/apache/tapestry/contrib/Contrib.library" />
    <!-- if you need file uploads -->
    <extension name="org.apache.tapestry.multipart-decoder"
        class="org.apache.tapestry.multipart.DefaultMultipartDecoder">                                                                                  <configure property-name="maxSize" type="double" value="-1" />
    </extension>
</application>

Recipe: The List Page:Let us consider a simple bean with two properties, an id and name. Here is the code for the bean:

 1
 2
 3
 4
 5
 6
 7
 8
 9
10
11
12
public class SimpleBean {
    private String id;
    private String name;

    /** Default constructor */
    public SimpleBean() {
        id = 0;
        name = "";
    }

    // public getters and setter omitted for brevity
}

To build a List page for this entity, you would need to have something to get the list of all SimpleBeans from the database based on some criteria. This is usually available from the Visit object or the Global object as a method. Here are the Java bean, the page specification and the HTML page for the SimpleBean list component.

 1
 2
 3
 4
 5
 6
 7
 8
 9
10
11
12
13
14
15
16
17
18
19
20
21
22
23
24
25
26
27
28
29
30
31
32
33
34
35
36
37
38
39
40
41
42
43
44
45
// Filename: SimpleBeanList.java
public class SimpleBeanList extends BasePage implements PageRenderListener {

    private List<SimpleBean> simpleBeanList;

    public List<SimpleBean> getSimpleBeanList() {
    }

    public void setSimpleBeanList(List<SimpleBean> simpleBeanList) {
        this.simpleBeanList = simpleBeanList;
    }

    /**
     * This is called before the page renders on the browser. We call out
     * to the DataManager() to populate the List before we start.
     */
    public void pageBeginRender(PageEvent event) {
        Visit visit = (Visit) getVisit();
        setSimpleBeanList(visit.getDataManager().getSimpleBeanList());
    }

    /**
     * This method is called when the Add link is clicked from the page.
     */
    public void add(IRequestCycle cycle) {
        SimpleBean simpleBean = new SimpleBean();
        SimpleBeanEdit simpleBeanEdit = (SimpleBeanEdit) cycle.getPage("SimpleBeanEdit");
        simpleBeanEdit.setSimpleBean(simpleBean);
        cycle.activate(simpleBeanEdit);
    }

    /**
     * This method is called when the id for a displayed SimpleBean is 
     * clicked on the page.
     */
    public void select(IRequestCycle cycle) {
        // get the id parameter in parameters[0]
        Object[] parameters = cycle.getServiceParameters();
        Visit visit = (Visit) getVisit();
        SimpleBean simpleBean = visit.getDataManager().getSimpleBean((Long) parameters[0]);
        SimpleBeanEdit simpleBeanEdit = (SimpleBeanEdit) cycle.getPage("SimpleBeanEdit");
        simpleBeanEdit.setSimpleBean(simpleBean);
        cycle.activate(simpleBeanEdit);
    }
}
1
2
3
4
5
6
7
8
9
<!-- Filename: SimpleBeanList.page -->
<?xml version="1.0" encoding="UTF-8"?>
<!DOCTYPE page-specification
    PUBLIC "-//Apache Software Foundation//Tapestry Specification 3.0//EN"     "http://jakarta.apache.org/tapestry/dtd/Tapestry_3_0.dtd">
    <page-specification class="com.mycompany.myapp.SimpleBeanList">
    <description>MyApp</description>
    <property-specification name="simpleBeanList" type="java.util.List" persistent="yes" />       
    <property-specification name="simpleBean" type="com.mycompany.myapp.SimpleBean" /> 
</page-specification> 
 1
 2
 3
 4
 5
 6
 7
 8
 9
10
11
12
13
14
15
16
17
18
19
20
21
22
23
<!-- Filename: SimpleBeanList.html -->
<table cellspacing="3" cellpadding="3" border="1">
  <tr>
    <th>Id</th>
    <th>Name</th>
  </tr>
  <span jwcid="@Foreach" source="ognl:simpleBeanList" value="ognl:simpleBean">
    <tr>
      <td>
          <span jwcid="@DirectLink" listener="ognl:listeners.select" parameters="ognl:simpleBean.id">
          <span jwcid="@Insert" value="ognl:simpleBean.id" />
        </span>
      </td>
      <td>
        <span jwcid="@Insert" value="ognl:simpleBean.name" />
      </td>
    </tr>
  </span>
</table>
<hr />
<span jwcid="@DirectLink" listener="ognl:listeners.add">Add New</span>
&nbsp;|&nbsp;
<span jwcid="@PageLink" page="Home">Home</span><br />

Recipe: The Edit Page: The Edit page shows a form with all the properties of the SimpleBean (except the id) exposed to an update. There is a Save and Delete button, which will result in the bean being saved (if new) or updated (if existing), and deleted respectively.

 1
 2
 3
 4
 5
 6
 7
 8
 9
10
11
12
13
14
15
16
17
18
19
20
21
22
23
24
25
26
27
28
29
30
31
32
33
// Filename: SimpleBeanEdit.java
public class SimpleBeanList extends BasePage {
    private SimpleBean simpleBean;

    public SimpleBean getSimpleBean() { return simpleBean; }
    public void setSimpleBean(SimpleBean simpleBean) { this.simpleBean = simpleBean; }
    
    /** 
     * Called when the Save button is clicked
     */
    public void save(IRequestCycle cycle) {
        Visit visit = (Visit) getVisit();
        visit.getDataManager().save(simpleBean);
        cycle.activate("SimpleBeanList");
    }

    /**
     * Called when the delete button is clicked.
     */
    public void delete(IRequestCycle cycle) {
        Visit visit = (Visit) getVisit();
        visit.getDataManager().delete(simpleBean);
        cycle.activate("SimpleBeanList");
    }

    /**
     * Called when the cancel button is clicked (if exists).
     */
    public void cancel(IRequestCycle cycle) {
        detach();
        cycle.activate("SimpleBeanList");
    }
}
1
2
3
4
5
6
7
8
<!-- Filename: SimpleBeanEdit.page -->
<?xml version="1.0" encoding="UTF-8"?>
<!DOCTYPE page-specification
    PUBLIC "-//Apache Software Foundation//Tapestry Specification 3.0//EN"
    "http://jakarta.apache.org/tapestry/dtd/Tapestry_3_0.dtd">
<page-specification class="com.mycompany.myapp.SimpleBeanEdit">
    <description>MyApp</description>
</page-specification>
 1
 2
 3
 4
 5
 6
 7
 8
 9
10
11
12
13
14
15
16
17
18
19
20
21
22
23
<!-- Filename: SimpleBeanEdit.html -->
<form jwcid="@Form">
  <table cellspacing="3" cellpadding="3" border="0">
    <tr>
      <td><b>Id:</b></td>
      <td>
        <span jwcid="@Insert" value="ognl:simpleBean.id" />
      </td>
    </tr>
    <tr>
      <td><b>Name:</b></td>
      <td>
        <span jwcid="@TextField" value="ognl:simpleBean.name" />
      </td>
    </tr>
    <tr>
      <td><input type="submit" value="Save" jwcid="@Submit" listener="ognl:listeners.save" /></td>
      <td><input type="reset" value="Delete" jwcid="@Submit" listener="ognl:listeners.delete" /></td>
    </tr>
  </table>
  <hr />
  <span jwcid="@PageLink" page="SimpleBeanList">Back to List</span>
</form>

Recipe: Login interception: Most dynamic applications are password protected somehow, since you dont want just about anybody with physical access to be able to edit or delete your data. This is also quite simple, just implement the following subclass of BasePage and extend all the application pages from this one instead of BasePage. In other words, you interject additional functionality via this class:

 1
 2
 3
 4
 5
 6
 7
 8
 9
10
11
12
public class ProtectedBasePage extends BasePage implements PageValidateListener {
    public void pageValidate(PageEvent event) {
        Visit visit = (Visit) getVisit();
        if (loggedOn) { // add application logic to figure this out
            return;
        } else {
            Login login = (Login) getRequestCycle().getPage("Login");
            login.setCallback(new PageCallback(this));
            throw new PageRedirectException(login);
        }
    }
}

Recipe: Creating components: Looking back on my original design for the tool, I feel it would have been a better decision if I had decided to build the List and Edit pages for each of the entities as components, and then hook them up into very thin wrapper pages once the workflow is known. Creating components is not very different from creating pages. Instead of a .page specification, you create a .jwc specification, which defines the parameters the component would take, if any. Also, you would extend BaseComponent instead of BasePage. Since your component will typically be an aggregation of other Tapestry or Tapestry:contrib components which already know how to render themselves, you should make the component subclass abstract and not implement the renderComponent() method. Here is an example that shows a little "welcome" component, whose text changes based on whether you are logged in or not.

 1
 2
 3
 4
 5
 6
 7
 8
 9
10
11
12
13
14
15
16
17
// Filename: WelcomeComponent.java
public abstract class WelcomeComponent extends BaseComponent {

    public String getUserName() {
        Visit visit = (Visit) getPage().getEngine().getVisit();
        return visit.getLoggedInUser().getName();
    }

    /**
     * Called when the logout link is clicked.
     */
    public void logout(IRequestCycle cycle) {
        Visit visit = (Visit) getPage().getEngine().getVisit();
        visit.invalidateSession();
        cycle.activate("Login");
    }
}
1
2
3
4
5
6
7
<!-- Filename: WelcomeComponent.jwc -->
<?xml version="1.0" encoding="UTF-8"?>
<!DOCTYPE component-specification PUBLIC
  "-//Apache Software Foundation//Tapestry Specification 3.0//EN"
  "http://jakarta.apache.org/tapestry/dtd/Tapestry_3_0.dtd">
<component-specification class="com.mycompany.myapp.components.WelcomeComponent"
    allow-body="no" allow-informal-parameters="no"> </component-specification> 
 1
 2
 3
 4
 5
 6
 7
 8
 9
10
11
12
13
14
15
16
17
<!-- Filename: WelcomeComponent.html -->
<span jwcid="$content$">
  <font size="-1">
    <b>
      <span jwcid="@contrib:Choose">
        <span jwcid="@contrib:When" condition="ognl:userName == null">
          Welcome. Please login.
        </span>
        <span jwcid="@contrib:Otherwise">
          Welcome, <span jwcid="@Insert" value="ognl:userName" />.
          <span jwcid="@DirectLink" listener="ognl:listeners.logout">Logout</span>
        </span>
      </span>
    </b>
  </font>
  <br />
</span>

Recipe: Reskinning the application: We can use the Border component for this. We really want to build up our own Border component with the specified template. The template would contain a RenderBody component which would pull up the specified component in that case. The pages would need to change to have the following enclosing tags to have a skin specified by the MyAppBorder component:

1
2
3
4
5
<html jwcid="$content$">
  <body jwcid="@MyAppBorder" subTitle="ognl:pageName">
  ... the original page contents ...
  </body>
</html>

There are still other things I have to figure out, such as how to preserve state when a user clicks a link on a partially filled form. The link could be create an additional sub-entity which is not created yet. I would like the user to go to an add form for this sub-entity, and once entry is completed, the sub-entity should be saved to the database, and the user directed back to the original page, with the filled in data intact. I will write about these issues once I figure out how to do it.